Quick Summary
Master night street photography with this comprehensive guide covering camera settings, creative techniques, and safety tips. Learn to capture the magic of city streets after dark.
Night Street Photography Settings & Techniques: Complete Guide
Night Street Photography Settings & Techniques: Complete Guide
The neon sign flickered above the ramen shop as I stood in the Tokyo rain, camera trembling in my hands. Not from cold, but from excitement. After months of struggling with night photography—blurry disasters, noise-filled nightmares, and missed moments in the dark—something finally clicked. That night, every frame was sharp, atmospheric, and alive with the electric energy only darkness can provide.
Night street photography transforms familiar streets into cinematic stages. Neon becomes paint, shadows become mystery, and ordinary people become film noir characters. But capturing this nocturnal magic requires understanding both technical challenges and creative opportunities unique to low-light conditions.
The Night Photography Mindset
Shooting at night isn't just daytime photography with less light—it's an entirely different art form. The rules change, the challenges multiply, but so do the creative possibilities. Where daylight reveals everything, darkness conceals and suggests, creating images impossible to capture when the sun shines.
I spent years avoiding night photography, intimidated by the technical demands. Then I realized my fear was misplaced. Night photography isn't harder than daytime shooting—it's different. Once you understand the differences and adjust your approach, the night becomes your creative playground.
The key mindset shift is embracing what darkness offers rather than fighting what it takes away. Yes, you lose some sharpness. Yes, you gain noise. But you also gain mood, mystery, and visual drama that harsh daylight can never provide. The constraints of night photography often lead to more creative, emotionally resonant images.
Essential Gear for Night Streets
Camera Body Requirements: Any modern camera can handle night street photography, but some excel. You need clean high ISO performance (at least to 6400), good autofocus in low light, and ideally in-body image stabilization. Full-frame sensors offer advantages, but modern APS-C cameras like the Fujifilm X-T5 or Sony a6700 perform admirably.
Lens Selection: Fast primes are your best friends at night. A 35mm f/1.4 or f/1.8 provides the perfect balance of field of view and light-gathering ability. The 50mm f/1.8 offers incredible value—every manufacturer makes an affordable version. Wide lenses like 24mm f/1.4 excel for environmental night scenes. Avoid slow zooms unless you're exclusively shooting with tripods.
Support and Stability: While I prefer handheld shooting for spontaneity, a lightweight travel tripod opens creative possibilities. For handheld work, practice proper breathing and bracing techniques. Lean against walls, lamp posts, or any stable surface. Some photographers use monopods for a balance of stability and mobility.
Essential Accessories: Extra batteries drain faster in cold weather and when using image stabilization. A lens hood is crucial for reducing flare from street lights. A microfiber cloth keeps your lens clear of rain or condensation. Consider a small flashlight for camera adjustments and safety.
Optional but Helpful: A cable release or smartphone app for remote shooting reduces camera shake. Rain covers protect gear in wet conditions common at night. Fast memory cards handle the larger files from high ISO shooting.
Camera Settings Deep Dive
ISO Strategy: Start at ISO 3200 and adjust from there. Modern cameras handle 6400 beautifully, and even 12,800 can work with proper post-processing. The key is finding your camera's "acceptable noise" threshold. I'd rather have a sharp, slightly noisy image than a clean, blurry one. Test your camera extensively to understand its high ISO personality.
Aperture Decisions: Shoot wide open (f/1.4-f/2.8) for maximum light and subject separation, or stop down slightly (f/2.8-f/4) for better sharpness and depth of field. The choice depends on your creative vision and available light. Remember that most lenses perform better stopped down one stop from maximum aperture.
Shutter Speed Calculations: The old 1/focal length rule needs adjustment for night photography. Double it for safety—use 1/100s minimum for a 50mm lens. With image stabilization, you might handhold 1/30s successfully, but subject movement becomes an issue. For static subjects, push slower; for moving people, stay faster.
Focus Mode Selection: Single-point autofocus with back-button focusing gives maximum control. In very low light, switch to manual focus with peaking or magnification. Some cameras offer low-light AF assist beams—disable these for discrete shooting. Consider zone focusing techniques for extremely dark conditions.
Metering Mysteries: Spot metering on highlights prevents blown neon signs and street lights. Center-weighted average works well for evenly lit scenes. Matrix/evaluative metering often underexposes at night, trying to brighten the darkness. Learn to read your histogram and ignore the LCD brightness.
Light Sources and Their Character
Neon Signs: The holy grail of night street photography. Neon provides natural color contrast and subject illumination. Position subjects between you and neon for rim lighting. Use neon reflections in wet streets for doubled impact. Different colors evoke different moods—red for energy, blue for melancholy, green for mystery.
Street Lamps: Sodium vapor creates warm orange tones, while LED streetlights tend toward cool blue. Use these color temperatures creatively rather than fighting them. Position yourself so street lamps backlight subjects for dramatic silhouettes or provide side lighting for texture.
Shop Windows: Illuminated storefronts create natural light boxes. Photograph subjects passing through these pools of light. The contrast between lit windows and dark streets provides natural frames. Interior lights often mix color temperatures, creating interesting color stories.
Vehicle Lights: Moving cars create light trails with slow shutters. Stationary vehicles provide dramatic rim lighting. Bus stops and train stations offer consistent, predictable lighting. Brake lights add punctuation marks of red in your compositions.
Mixed Lighting Magic: Night scenes rarely have single light sources. Embrace the color chaos—mixed lighting creates visual interest impossible to replicate in controlled conditions. Use white balance creatively to emphasize certain color temperatures while letting others shift.
Composition in Darkness
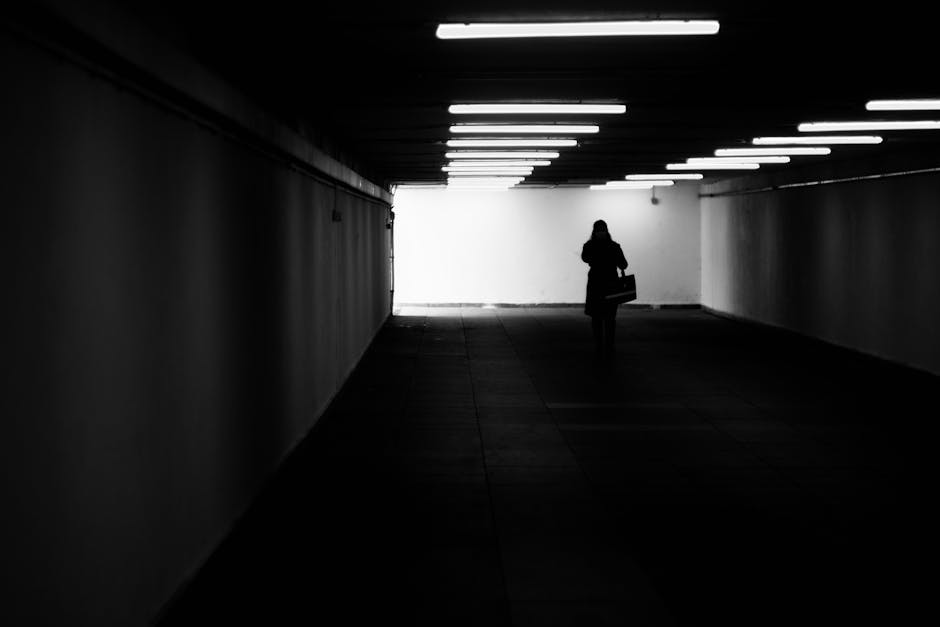
Simplify Your Frames: Darkness naturally simplifies by hiding distracting elements. Use this to create minimalist compositions impossible during daytime. A single figure under a street lamp becomes a complete story. Isolated light sources become compositional anchors.
Shadow Play: Shadows at night are deeper and more dramatic than daytime shadows. Use them to hide elements, create mystery, or divide frames. The absence of detail in shadows forces viewers to imagine what lurks in darkness, engaging them more deeply with your images.
Light as Subject: Sometimes light itself becomes your primary subject. Bokeh from distant lights, neon reflections, or the glow of phone screens can be more interesting than traditionally lit subjects. Abstract light patterns create emotional responses without literal content.
Leading Lines of Light: Streets lights create natural leading lines. Light trails from traffic provide dynamic diagonals. Illuminated architecture offers geometric patterns. Use these light-based compositional elements to guide viewers through your frames.
Contrast and Mood: The extreme contrast of night photography—bright lights against deep shadows—creates inherent drama. Position elements to maximize this contrast. A bright sign against a black sky. A lit face emerging from shadow. These contrasts create visual tension that holds attention.
Focusing in Low Light
Autofocus Assistance: Modern cameras increasingly excel at low-light autofocus, but knowing their limits helps. Look for contrast edges—signs, light sources, or clothing patterns. Some cameras focus better on vertical lines, others on horizontal. Learn your camera's preferences.
Manual Focus Techniques: In extreme darkness, manual focus often proves more reliable. Use live view magnification to nail critical focus. Focus peaking highlights in-focus edges. The distance scales on manual lenses become invaluable for zone focusing.
Pre-Focus Strategies: Anticipate where action will occur and pre-focus on that spot. Street corners, illuminated areas, and natural gathering points work well. This technique, combined with smaller apertures, ensures sharp images even in challenging conditions.
Hyperfocal Mastery: At night, hyperfocal focusing requires adjustment. The darkness hides slight softness, allowing you to push hyperfocal distances closer. An f/4 aperture that seems insufficiently deep in daylight might work perfectly in night's forgiving darkness.
Focus and Recompose Carefully: The shallow depth of field from wide apertures makes focus-and-recompose risky. Slight angle changes shift the focal plane significantly. When possible, move your focus point rather than recomposing, or stop down for more focusing latitude.
Movement and Motion
Freezing Night Action: High ISOs enable faster shutter speeds for sharp subjects. ISO 6400 at f/2 might give you 1/125s—enough to freeze walking pedestrians. For truly sharp motion, push to ISO 12,800 or accept some motion blur as creative element.
Embracing Motion Blur: Night photography offers unique motion blur opportunities. Ghostly figures passing through light pools. Streaking taxis. Blurred crowds suggesting urban energy. Use slower shutters (1/15s-1/30s) intentionally for these effects.
Panning Techniques: Following moving subjects with slower shutters creates sharp subjects against streaked backgrounds. This technique particularly suits cyclists, cars, or running figures. The key is matching your panning speed to subject movement.
Static Elements with Motion: Combine sharp static elements with moving ones for dynamic compositions. A still person waiting while crowds blur past. Sharp architecture with streaking traffic. These contrasts visualize time's passage.
Long Exposure Creativity: With a tripod, explore longer exposures. 2-4 seconds turn walking people into ghosts. 10-30 seconds create light trails and empty streets. These techniques transform busy locations into surreal, empty stages.
Color vs Black and White
When Color Wins: Neon signs, mixed lighting, and colorful street scenes often demand color treatment. The emotional impact of red neon or blue twilight gets lost in monochrome. When color tells the story, embrace it fully.
Black and White Advantages: High ISO noise becomes grain in black and white, adding character rather than distraction. Mixed color temperatures that clash in color harmonize in monochrome. Black and white emphasizes light, shadow, and form over color distractions.
Partial Color Techniques: Sometimes desaturating colors rather than full monochrome works best. Muted colors maintain some environmental information while reducing color chaos. This approach splits the difference between full color and black and white.
White Balance as Creative Tool: Don't always correct white balance. Extreme blue creates cold, isolated moods. Warm orange suggests comfort and energy. Use white balance shifts to enhance the emotional message of your images.
Post-Processing Decisions: Shoot in RAW to maintain maximum flexibility. Night images often benefit from careful color grading. What looks garish on camera LCD might be perfect with subtle adjustments. Reserve judgment until you see images on a calibrated monitor.
Common Challenges and Solutions
Noise Management: Accept that night images will have noise. The question is how much and what kind. Luminance noise (grain) often adds character. Color noise (red/green speckles) always detracts. Use noise reduction selectively, preserving detail while reducing color artifacts.
Blown Highlights: Neon signs and street lights easily overexpose. Use highlight priority metering or manually underexpose to protect highlights. You can lift shadows in post, but blown highlights are gone forever. When in doubt, protect the lights.
Autofocus Hunting: In low contrast scenes, autofocus may hunt endlessly. Switch to manual focus immediately rather than missing shots. Alternatively, find a high-contrast edge at the same distance as your subject, focus there, then recompose.
Camera Shake: Even with image stabilization, night photography pushes the limits. Improve your handheld technique: exhale before shooting, squeeze don't jab the shutter, brace against stable objects. Consider raising ISO over using slower shutters.
Safety Concerns: Night photography requires extra awareness. Work in familiar areas initially. Carry minimal gear to stay mobile. Trust your instincts—no photograph is worth compromising safety. Consider photographing with others when exploring new areas.
Location Scouting and Timing
Blue Hour Magic: The 30-45 minutes after sunset provide the best night photography conditions. Sky retains detail and color while artificial lights gain prominence. This balance creates more dynamic images than full darkness.
Weather Advantages: Rain transforms night streets with reflections and atmosphere. Fog diffuses lights creating ethereal moods. Snow adds texture and simplifies scenes. What seems like "bad" weather often creates the best night photography conditions.
Urban vs Suburban: City centers offer abundant light and activity. Suburban areas provide isolation and mood. Both have merits—choose based on your creative goals. Sometimes quiet suburban streets tell more intimate stories than busy urban centers.
Event Opportunities: Festivals, concerts, and gatherings provide extra light and energy. Night markets combine good lighting with interesting subjects. Holiday seasons add decorative lights and cheerful moods. Plan around these opportunities.
Seasonal Considerations: Winter's early darkness provides more shooting time but challenges batteries and comfort. Summer nights stay warm but darkness comes late. Each season offers different moods and opportunities—embrace them all.
Post-Processing Night Images
RAW Processing Essentials: Lift shadows carefully to avoid excessive noise. Protect highlights aggressively—they define night photography's character. Adjust whites and blacks for proper contrast. Use graduated filters to balance extreme brightness differences.
Color Grading Approaches: Split-toning adds atmosphere—warm highlights with cool shadows, or vice versa. Subtle color shifts enhance mood without appearing unnatural. Match grading to the scene's emotional content.
Noise Reduction Strategy: Apply noise reduction selectively. Protect details in important areas while smoothing unimportant regions. Luminance noise reduction at 20-40% often suffices. Color noise reduction can be more aggressive.
Local Adjustments: Use masks to treat different image areas separately. Brighten faces while keeping backgrounds dark. Enhance neon sign colors without affecting other elements. These targeted adjustments create professional results.
Output Considerations: Night images often print darker than they appear on screen. Brighten slightly for print output. For web display, consider that viewers may use uncalibrated monitors in bright environments.
Creative Techniques
Silhouettes and Shapes: Backlit figures against bright backgrounds create powerful graphic images. Look for interesting body positions or interactions. Silhouettes remove identifying features, making images more universal.
Reflection Multiplication: Wet streets after rain double your compositional elements. Position yourself to capture both reality and reflection. Puddles, windows, and car surfaces all offer reflection opportunities.
Mixed Exposures: Combine multiple exposures for creative effects. Sharp architecture with motion-blurred people. Or use intentional camera movement for abstract light paintings while maintaining some recognizable elements.
Minimalist Night: Darkness naturally simplifies. Use this for minimalist compositions—single light sources, isolated figures, geometric shadows. Less becomes more when darkness hides distractions.
Story Sequences: Night scenes often unfold slowly. Capture sequences showing progression—someone entering light, pausing, exiting into darkness. These mini-narratives engage viewers beyond single images.
Safety and Ethics
Personal Safety First: Stay aware of surroundings. Avoid displaying expensive gear unnecessarily. Work in pairs when possible. Know your exits. Trust instincts over photographic opportunities.
Respect Privacy: Night photography can feel more invasive. Be extra respectful of personal space. Avoid photographing through residential windows. Consider subject comfort even if legally permitted.
Local Regulations: Some areas restrict night photography or tripod use. Research local rules. Security guards may question your activities—remain calm and cooperative. Having sample work demonstrates legitimate artistic intent.
Equipment Protection: Darkness increases theft risk. Use inconspicuous bags. Insure valuable gear. Attach straps securely. Consider less expensive equipment for risky locations.
Weather Challenges: Cold drains batteries—carry extras close to body warmth. Protect gear from rain and condensation. Allow equipment to adjust to temperature changes gradually to prevent internal condensation.
Building Night Photography Skills
Start Close to Home: Master night photography in familiar neighborhoods before venturing out. You'll know safe areas, interesting locations, and optimal timing. Familiarity reduces variables while learning.
Progressive Challenges: Begin with static subjects and abundant light. Progress to moving subjects and darker conditions. Build skills incrementally rather than attempting everything immediately.
Study Light Behavior: Spend time observing without photographing. Notice how different lights interact, where shadows fall, how atmosphere affects illumination. This observation improves your ability to predict and capture optimal moments.
Regular Practice: Night photography skills deteriorate without practice. Schedule regular night sessions, even brief ones. Consistency beats occasional marathons for skill development.
Review and Analyze: Study your night images critically. What works? What doesn't? Compare successful frames with failures to understand the differences. This analysis accelerates learning.
Advanced Night Techniques
Multiple Exposure Blending: Capture different exposures for highlights and shadows, blend in post. This extends dynamic range beyond single-exposure limits. Requires tripod and static scenes but produces professional results.
Focus Stacking: For maximum sharpness throughout frame, shoot multiple images focused at different distances. Blend in post for extreme depth of field impossible with single exposures.
Light Painting Addition: During long exposures, add light with flashlights or phones to selectively illuminate subjects. This technique requires practice but creates unique, impossible-to-replicate images.
HDR with Restraint: High dynamic range processing can help with extreme contrast, but use subtly. Natural-looking results trump obvious HDR effects. The goal is extended range, not surreal appearance.
Panoramic Nights: Stitch multiple frames for wide night vistas. Overlap generously and maintain consistent exposure between frames. Night panoramas capture urban scale dramatically.
The Magic of Darkness
Night street photography initially intimidated me because I focused on what darkness took away—easy focusing, low ISOs, abundant light. But darkness gives more than it takes. It provides mood impossible in sunshine, transforms mundane locations into film sets, and reveals a different cast of characters living parallel lives after dark.
The technical challenges are real but surmountable. Modern cameras make night photography more accessible than ever. Understanding your gear, mastering appropriate techniques, and embracing darkness's creative possibilities opens an entire new world of photographic opportunities.
Every city transforms at night. Familiar streets become mysterious. Ordinary people become characters in urban stories. Light becomes precious, dramatic, and emotionally charged. This transformation awaits anyone willing to venture out after sunset with camera in hand.
The night streets are calling. Your camera is capable. The only question remaining is: what stories will you discover in the darkness?
---
Master the art of night street photography and share your nocturnal captures with our growing community at InTheStreets. Join photographers worldwide exploring the creative possibilities that emerge after dark.
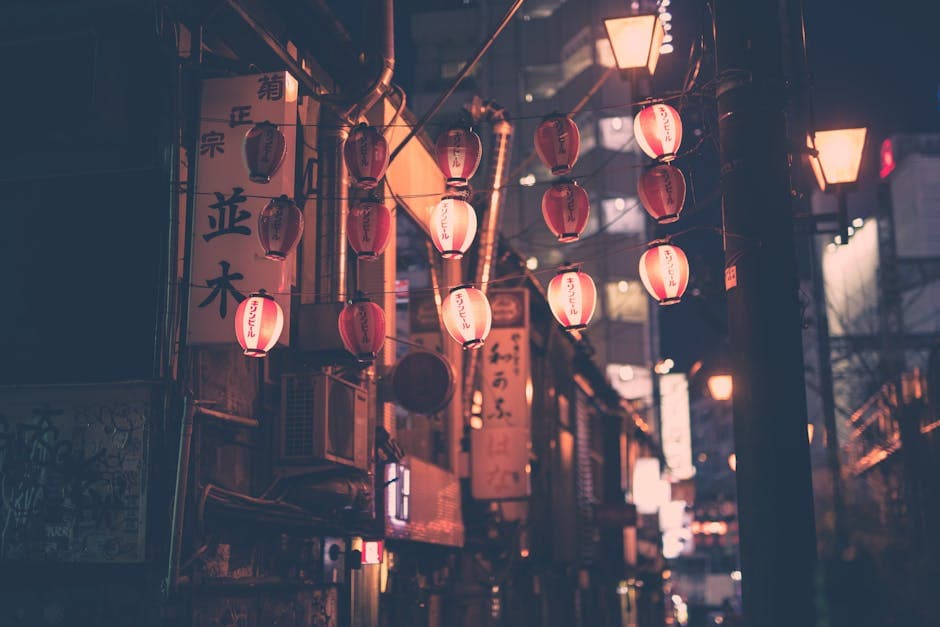
*Featured image: "Moody Tokyo night street with red lanterns" by Janko Ferlic via Pexels*